

Click to View Table of Contents
With our beginner’s guide to making espresso at home, you’ll be pulling the perfect shot in no time. Use our troubleshooting tips to help you fine-tune your process.
Making espresso at home will take a bit of practice, but it’s well worth it! Plan on doing a lot of experimenting before you pull the perfect shot of espresso.
You probably won’t get it just right the first time! However, even the most budget-friendly espresso machines can produce a decent shot of espresso if you use fresh coffee beans that have been freshly ground, and as long you’ve got the temperature, grind, and tamp right.
It’s definitely worth learning how to make espresso at home because it’s one of the most popular coffee drinks in the US and around the world. It also forms the base of other delicious coffee shop drinks, too.
The learning process is part of the fun, so let’s get started! Here’s our beginner’s guide to pulling the perfect shot of espresso. Be sure to read all the way to the end for some troubleshooting tips.

Making Espresso at Home: How to Make Espresso Step by Step
Before you do anything else, preheat your espresso machine, the portafilter, and your cup. Although you could just turn the machine on and wait 20 minutes for it to heat up, I’m not that patient. Especially when it comes to my morning coffee. To get things moving quickly, go ahead and pull a couple of “blank shots” by running your machine with water only, no espresso.
When making espresso at home, the quality of the water you use is also essential. Your water should be filtered or bottled, but not distilled. Distilling removes all the minerals, which will leave your espresso tasting flat. On the other hand, using unfiltered water that has too many minerals will clog up your espresso machine and significantly shorten its life. And, of course, it will affect the taste, also.
Once you’ve got everything nice and hot, it’s time to get down to the good stuff!

Step 1: How to Grind the Beans for Making Espresso
If you want to pull the perfect shot of espresso, you’ve got to use fresh coffee beans and grind the beans immediately before you brew. One of the most important aspects of getting the perfect shot is the grind texture. If the grind is too fine, it will over-extract the flavors and aroma, leaving you with a shot that’s bitter and tastes burnt. If the grind is too coarse, you’ll have an under-extracted shot that tastes weak, watery, and sour.
What you’re going for is a grind texture that somewhat like granulated sugar. You will know you’re getting close when the grounds begin to clump together. You’ll need to experiment with the grind to get it just right. You may need to adjust the grind a bit every time you try new beans. And, of course, every espresso machine is different. Some like a fine grind, while some do better with a slightly coarser grind. In the end, it’s going to be based on your personal taste, so be prepared to experiment.

Step 2: The Proper Dose of Coffee for Making Espresso
Dose refers to how much ground coffee you will need to put in the portafilter to pull the perfect espresso shot. For a double shot of espresso, you will need somewhere between 18 and 21-grams of ground coffee. The body and intensity of your shot will increase as you add more coffee. Once again, you will need to experiment with this amount to get it just right, based on your machine, the beans you’re using, and of course your personal taste. For consistency, I recommend weighing your grounds, so you can recreate the perfect shot each time.
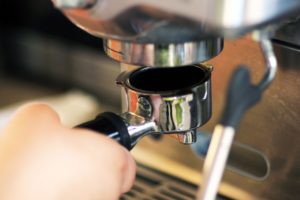
Step 3: Level and Tamp the Coffee
Tamping is an essential step in pulling the perfect espresso shot. It ensures even extraction by leveling the grounds and packing them so that the water contacts and is forced through the grounds consistently. Level the grinds in the portafilter by gently tapping the side, and then tamp. To achieve the proper tamping technique, your elbow should be at a 90-degree angle so that you’re tamping straight down. Place the portafilter on your countertop and apply even, firm pressure with your tamper until the grounds have a smooth, polished look. If your grounds are coarser, a firmer tamp will be needed.
Step 4: Water Temperature for Making Espresso
Some machines will allow you to adjust the temperature, while others will be preset. If yours allows for adjustment, experiment with it to see how the temperature affects the flavor. Higher heat accentuates the “roasty” flavor of the coffee, while lower heat draws out more brightness. If you don’t want to play around with this setting, it’s perfectly ok to leave it where the manufacturer set it.
Step 5: Brewing the Perfect Shot of Espresso at Home
Now, it’s time to brew your shot. Engage the portafilter into the machine’s brew head as directed by the manufacturer and place your cup underneath it. If your machine doesn’t have a built-in timer, get your timer ready so that you can time your shot.
Timing is the most critical step in making espresso at home. Here’s how to get it just right:
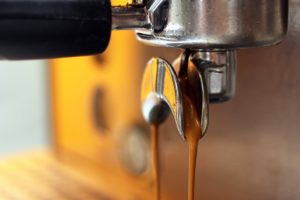
Start your machine and observe. When you have your dose, grind, and tamp just right, the first part of your brew will be dark. Then, it will turn to a golden brown, foamy mixture. It should flow into the cup in a thin, even stream that doesn’t break. Each shot should use 1-ounce of water, so if you’re brewing a double shot, stop the machine at 2-ounces and check your time. When everything is ideal, your time should be somewhere between 25 and 30 seconds. If it was too fast or too slow, you’ll need to make some adjustments to your grind, dose, and tamp and try again. Or, if you notice that your shots are coming out of the spouts unevenly, your tamping isn’t even.
What you’re looking for is a fine golden crema that floats gently above a dark, rich brew. And, of course, the taste and aroma will tell you everything you need to know. Every machine and taste is different, so be prepared to do some experimenting. These general guidelines will help you make espresso at home, but the only way to pull the perfect espresso shot is to play around with the grind and tamp until you get it just right.
Making Espresso at Home: Troubleshooting Tips
Don’t worry! Making espresso at home takes practice, and nobody gets it perfect the first time! If something just doesn’t taste right, here are some tips to help you out.
-
It took too long to brew the shot:
The water is flowing too slowly. You might have dosed too much coffee, the grind may be too coarse, or you may have tamped too firmly.
-
The shot brewed too quickly:
When a shot brews too quickly, it will taste flat… like you’re drinking hot water with little or no coffee flavor. To fix under-extraction, you may need to dose more coffee, use a finer grind, or tamp more firmly.
-
The shot has a bitter taste:
Over-extraction is just as unpleasant as under-extraction. When you’re getting too much flavor out of your coffee, try decreasing the temperature of the water or take steps to shorten the brew time (see tips above).
-
The shot has a sour taste:
When a shot tastes sour, it means that the chemical reaction that takes place between the water and the coffee stopped too early. To correct it, you’ll need to increase the temperature of the water or extend the brew time (see tips above).
-
The shot is too watery:
The perfect shot of espresso is thick, almost syrupy. To get it just right, you have to have your dose and brewing time right. Your coffee must also be fresh. If any of these factors are missing, the shot will be thin. Try dosing more coffee, using a finer grind, tamping more firmly, and of course, make sure your coffee is fresh.
-
The stream was uneven:
As you probably already know, water takes the path of least resistance. If you don’t have your tamp right, the stream will be uneven because the water will find the weak spots to flow through. To correct it, make sure your distribution is even, and you have a level, firm tamp.
-
There’s not enough crema:
Bummer! When there’s not enough, or no, crema, it usually means that your puck isn’t providing enough resistance. You may need to dose more coffee or use a finer grind. This can also happen if your coffee isn’t fresh, so always use fresh coffee!
-
There’s too much crema:
Sometimes, beans that are super fresh aren’t quite ready to use because they still contain gas from the roasting process. If your shot has way too much crema, let the beans rest for a few days and try again.

Final Tips for Making Espresso at Home
All that being said, there are a lot of variables that go into pulling the perfect shot of espresso, not the least of which is your own personal taste. If you make espresso at home and it tastes good to you, don’t worry if you aren’t doing it the way someone else says it should be done. Enjoy experimenting with the process and don’t take it too seriously!
Once you’ve pulled the perfect shot of espresso, use it to make one of these delicious espresso drinks:
- How to Make a Caramel Macchiato (Hot or Iced)
- Vanilla Latte: Make it Hot or Iced, Just Like Your Favorite Coffee Shop
- Affogato: Coffee and Dessert in One Cup
We love to see photos of your creations! Be sure to share them on Instagram and tag @Be_Your_Own_Barista!
And, be sure to request your favorite recipes or ask any questions you may have about making espresso at home in the comments below or on our Facebook page!